

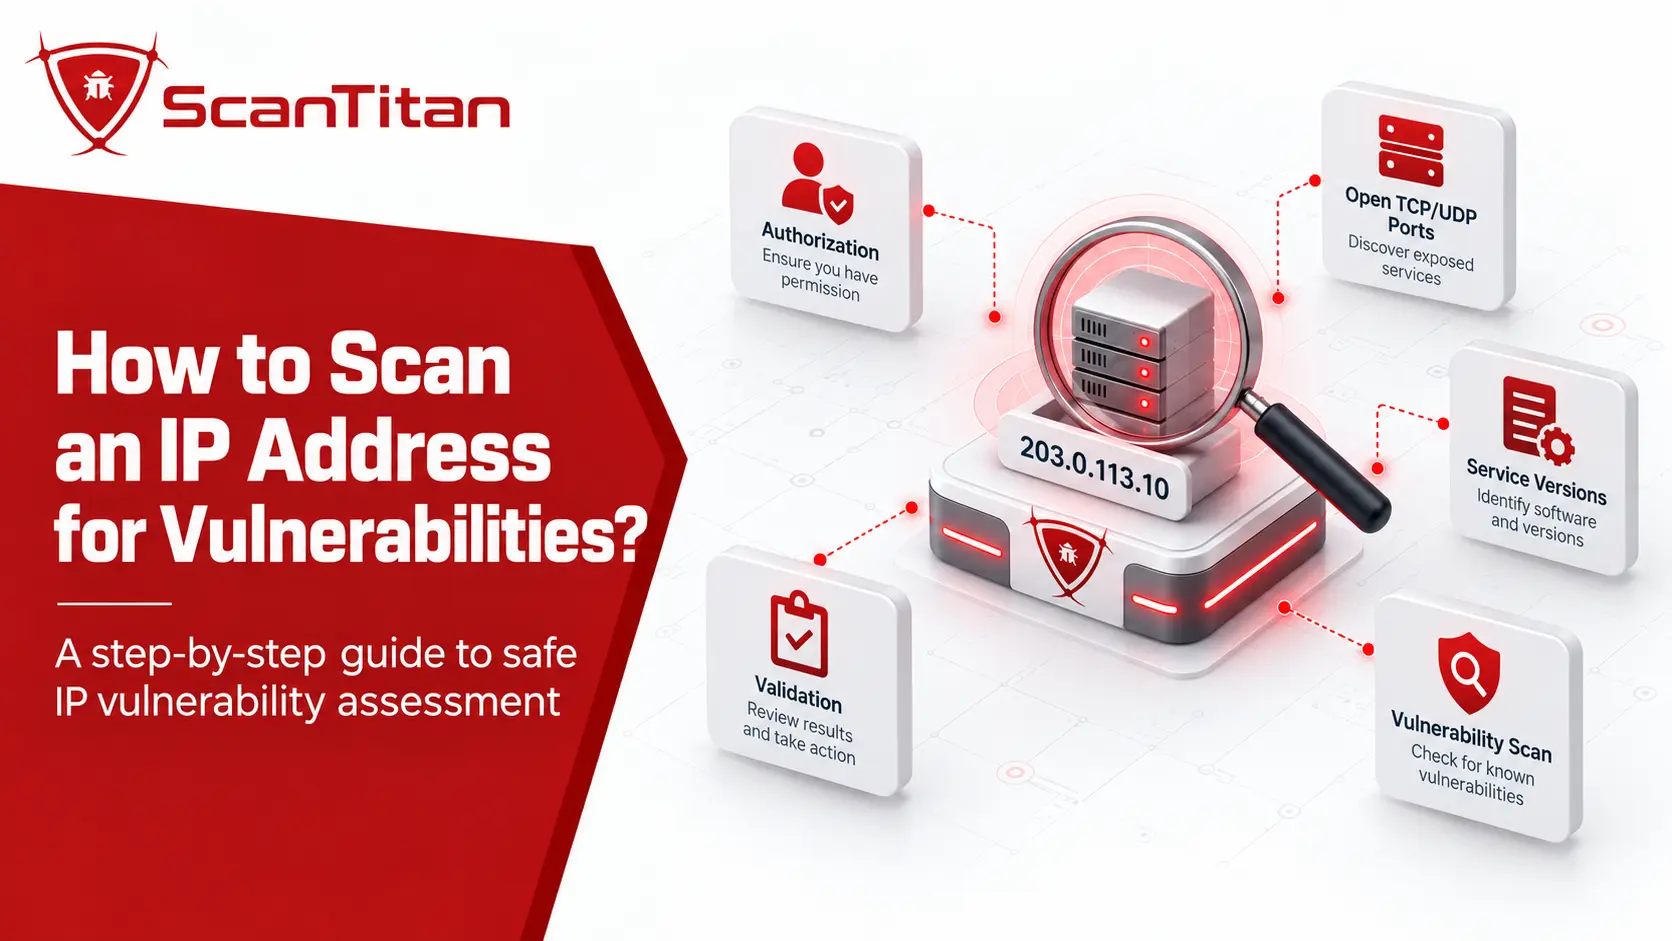
If you want to know how to scan an IP address for vulnerabilities, the process goes beyond checking whether a few ports are open. A proper assessment verifies the correct and authorized target, identifies reachable TCP and relevant UDP services, fingerprints the software behind them, runs vulnerability-specific checks, validates important findings, prioritizes confirmed weaknesses, applies the right remediation, and rescans the same IP to verify the fix. The scan location also matters because external and internal scans provide different views of exposure.
QUICK ANSWERTo scan an IP address for vulnerabilities, verify the target and authorization, discover reachable ports, identify exposed services and versions, run a vulnerability scanner against the IP, validate the findings, prioritize confirmed weaknesses, remediate them, and rescan the same target to verify the fix.
Before You Scan: Make Sure You Have the Right IP Address
Before opening a vulnerability scanner, confirm exactly which address you intend to test. A public IP, private IP, and IPv6 address can all be valid scan targets, but they provide different views of the environment.
| Address type | Example | What it usually represents |
|---|---|---|
| Public IPv4 | Internet-routable address | An endpoint that can potentially be reached from the public internet, depending on firewall and routing rules. |
| Private IPv4 | 10.x.x.x, 172.16–31.x.x, 192.168.x.x | An address normally reachable only from an internal network, VPN, or another connected scanning location. |
| IPv6 | IPv6 host address | A separate routed address whose exposure may differ from the same host’s IPv4 configuration. |
If you scan the public IP of a router, firewall, NAT gateway, or load balancer, you are assessing what is visible through that public endpoint. You are not automatically vulnerability-scanning every internal workstation or server behind it.
If you need a deeper explanation of the concept itself before following this procedure, see our guide to what an IP vulnerability scan is.
USE AN AUTHORIZED TARGETThe examples below use 203.0.113.10, an address from a block reserved for documentation. Replace it only with an IP address you own or are explicitly authorized to assess.
How to Scan an IP Address for Vulnerabilities
The process below separates discovery from actual vulnerability detection. That distinction matters because discovering an open port or identifying software does not by itself prove that the target is vulnerable.
Step 1: Confirm Authorization and Define the Scan Scope
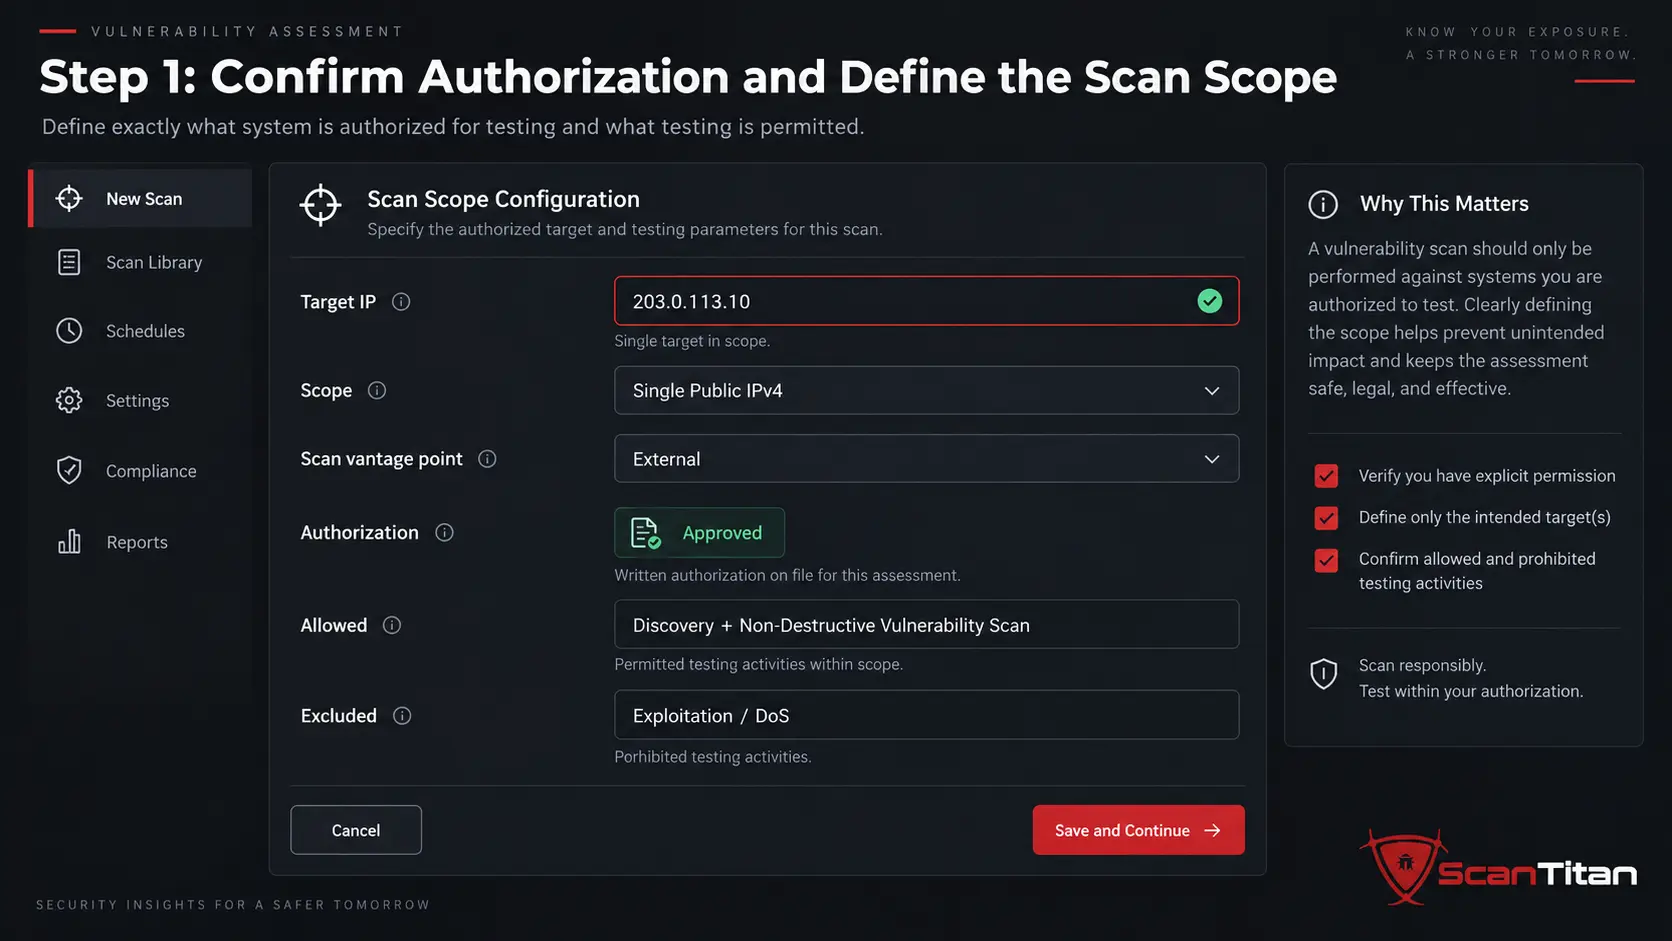
Before sending scan traffic, document exactly what you are permitted to test. This is especially important for production systems, customer environments, hosted infrastructure, and any third-party asset.
At minimum, record:
- Target: the exact IPv4 or IPv6 address.
- Ownership: who owns or controls the address.
- Authorization: who approved the assessment.
- Vantage point: whether the test is external or internal.
- Scan window: when scanning is permitted.
- Authentication: whether credentialed testing is allowed.
- Excluded activity: any intrusive, exploitative, or denial-of-service checks that are prohibited.
A simple scope record could look like this:
Target: 203.0.113.10
Scope: Single public IPv4 address
Vantage point: External
Authorization: Written approval from asset owner
Allowed testing: Discovery and non-destructive vulnerability scanning
Excluded: Exploitation and denial-of-service testing
Keeping the scope explicit helps prevent accidental scanning of unrelated infrastructure and makes the results easier to reproduce later.
Step 2: Check Whether the IP Is Reachable
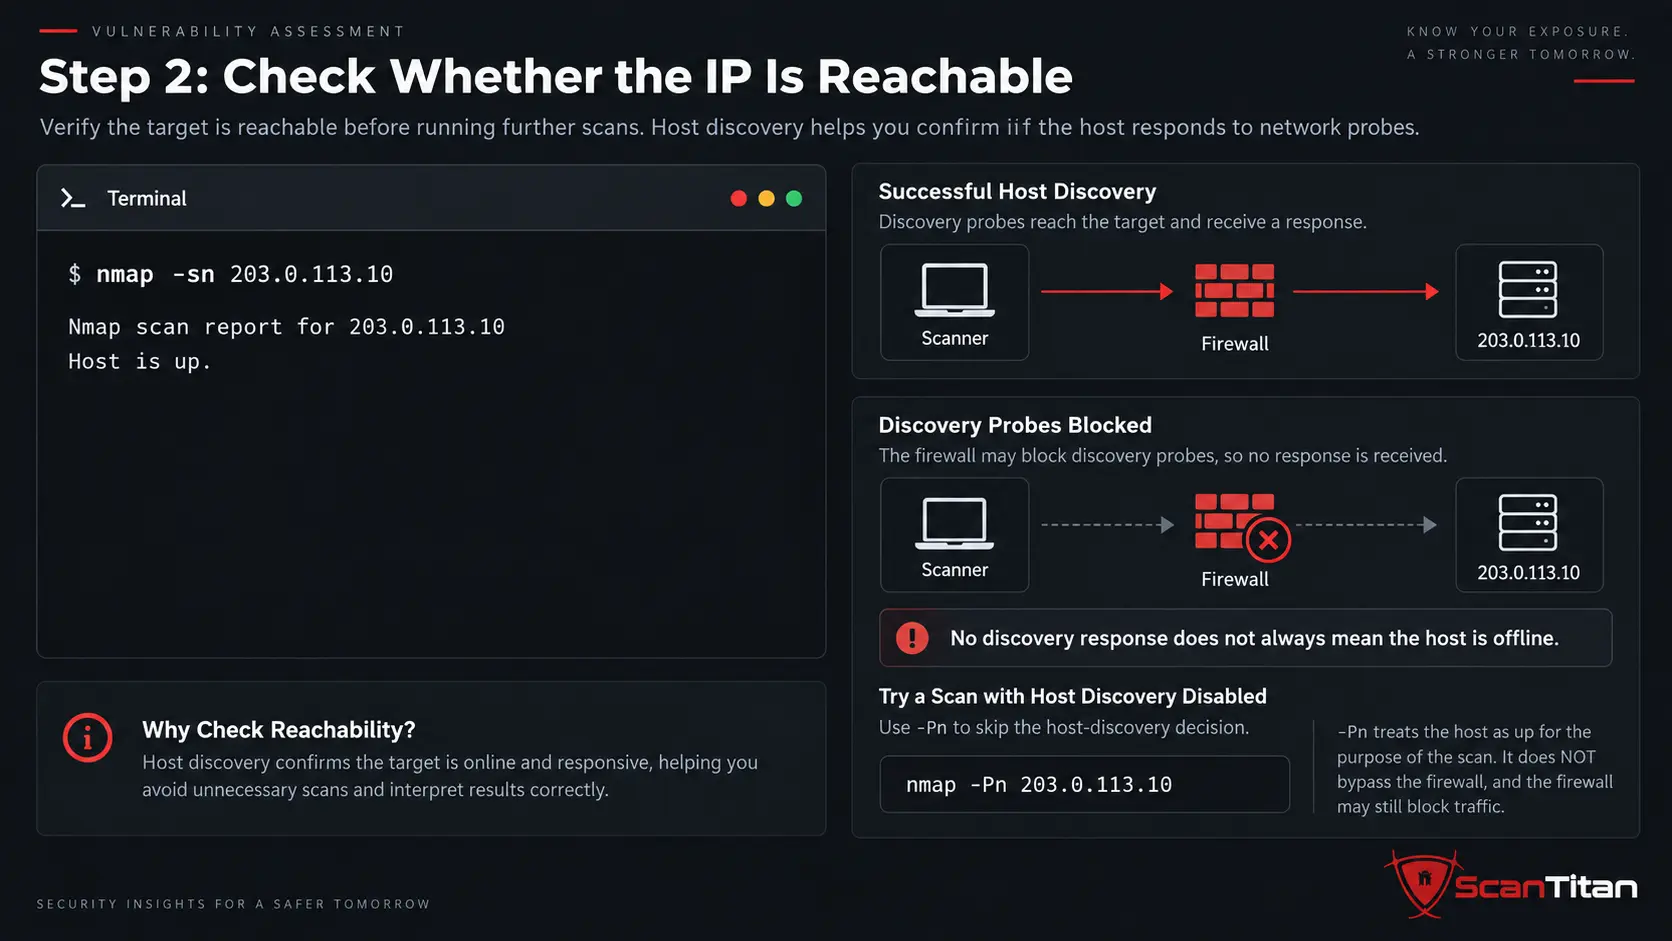
Start by checking whether the target responds to host-discovery probes.
nmap -sn 203.0.113.10With -sn, Nmap performs host discovery without proceeding to its normal port scan.
A responsive host could produce output similar to:
Nmap scan report for 203.0.113.10
Host is up.
But a missing response does not necessarily prove that the machine is offline. Firewalls can block discovery traffic while still allowing real services such as HTTPS or SSH.
What if the server is online but Nmap reports it as down?
If you control the server and already know it is online, you can tell Nmap to skip its normal host-discovery decision:
nmap -Pn 203.0.113.10The -Pn option does not bypass a firewall. It simply tells Nmap to treat the supplied target as active and continue with the scan rather than stopping because discovery probes received no response.
HOW TO INTERPRET THIS STEPReachability is only a preliminary signal. A target that responds is not necessarily vulnerable, and a target that ignores discovery probes is not necessarily offline.
Step 3: Find the Open TCP Ports
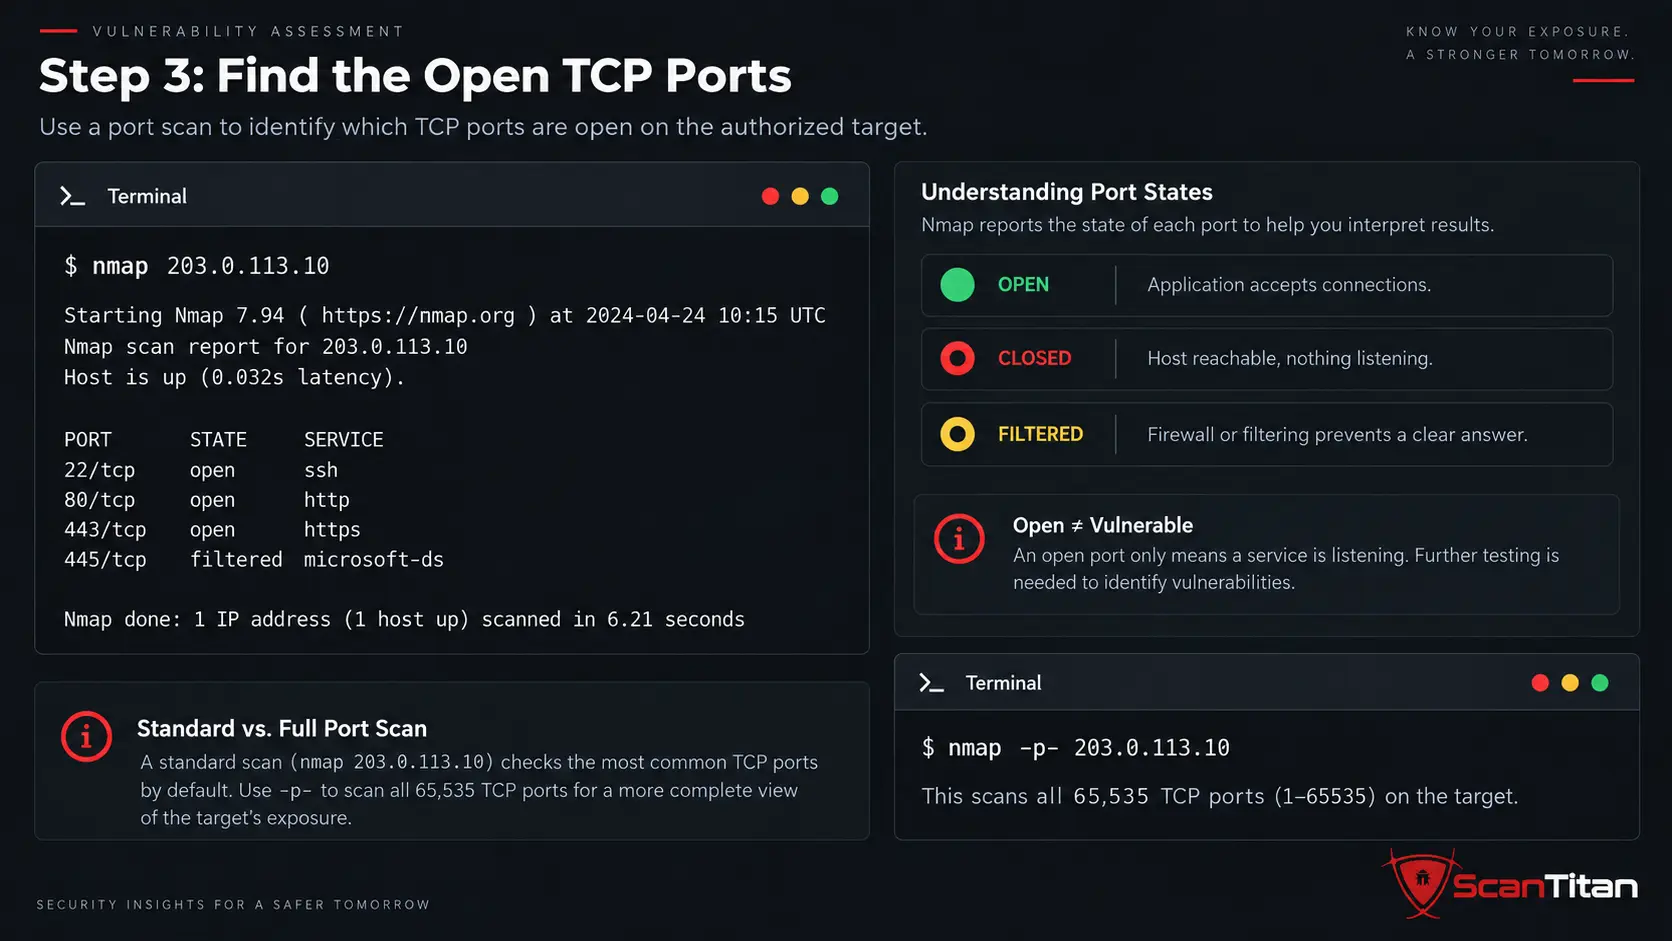
Once you have the correct target, identify which TCP services are reachable from your scan location.
nmap 203.0.113.10A standard Nmap scan checks 1,000 commonly used TCP ports rather than all 65,535 possible TCP ports.
An illustrative result might look like this:
PORT    STATE     SERVICE
22/tcp  open      ssh
80/tcp  open      http
443/tcp open      https
445/tcp filtered microsoft-ds| Port state | What it means |
|---|---|
| open | An application is accepting connections on the port. |
| closed | The host is reachable, but no application is currently listening on that port. |
| filtered | Network filtering prevents the scanner from determining whether the port is open. |
| open|filtered | The scanner cannot distinguish between an open service and filtering. |
These states describe what the scanner sees from its current network location. A port can appear open from inside the network and filtered from the public internet.
When should you scan all TCP ports?
If broader coverage is required by the approved assessment scope, Nmap can scan the complete TCP port range:
nmap -p- 203.0.113.10On systems where raw-packet privileges are available, an explicit SYN scan can also be used:
nmap -sS -p- 203.0.113.10Do not automatically apply the most aggressive scan configuration to production infrastructure. Scan depth should match the authorized scope and operational tolerance of the environment.
AN OPEN PORT IS NOT AUTOMATICALLY A VULNERABILITYPort 443 being open on a web server may be completely intentional. The next questions are what software is behind it, how that service is configured, whether a known weakness applies, and whether the exposure is necessary.
Step 4: Check Relevant UDP Services
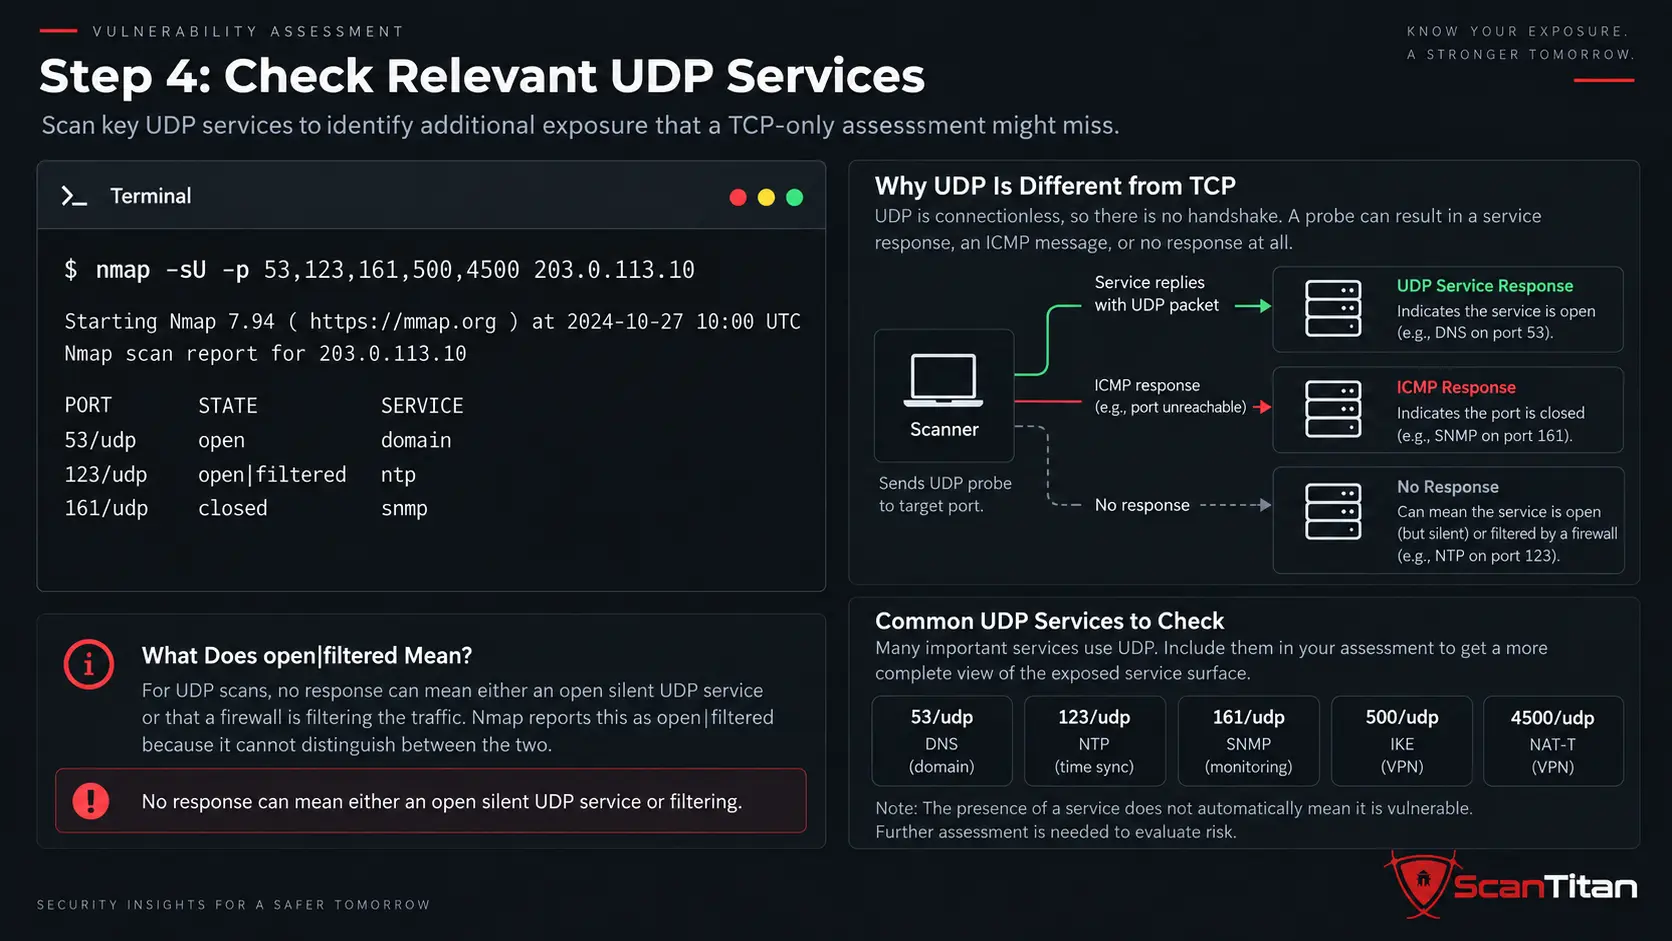
A TCP-only assessment can give an incomplete picture. Infrastructure may also expose services over UDP, including DNS, SNMP, NTP, and some VPN protocols.
If these protocols are relevant to the system being assessed, you can test selected UDP ports:
nmap -sU -p 53,123,161,500,4500 203.0.113.10An example result could look like:
PORT     STATE          SERVICE
53/udp   open           domain
123/udp  open|filtered  ntp
161/udp  closed         snmp
UDP results require different interpretation from TCP. Many UDP applications do not respond to unexpected packets, and firewalls can silently discard the traffic. In both cases, the scanner may receive no response and return open|filtered.
That result should not automatically be treated as confirmation that the UDP service is running.
Step 5: Identify the Services and Software Versions
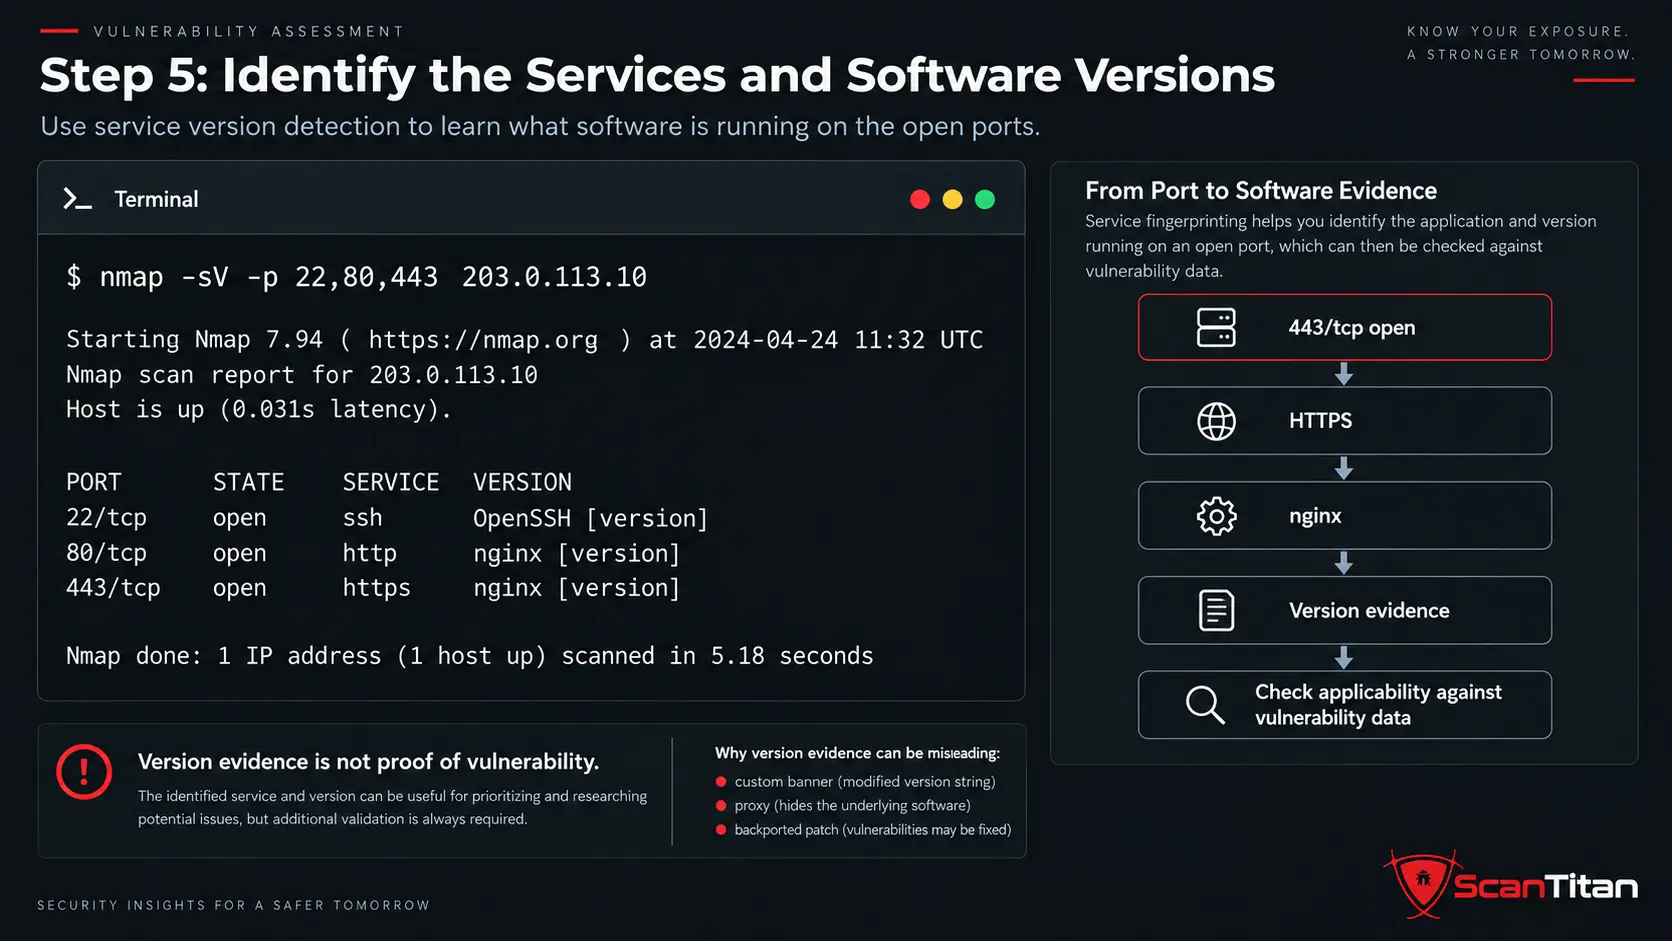
A port number alone does not provide enough evidence for vulnerability assessment. The next step is to identify what is actually listening behind the exposed ports.
nmap -sV -p 22,80,443 203.0.113.10A fictional result could look like this:
PORT    STATE SERVICE VERSION
22/tcp  open  ssh     OpenSSH ...
80/tcp  open  http    nginx ...
443/tcp open  https   nginx ...
Version detection sends additional probes and attempts to determine the real protocol, software product, and version instead of assuming a service based only on the port number.
The difference is important:
22/tcp opentells you that something accepts connections.
22/tcp open ssh OpenSSH [detected version]provides substantially more evidence that can be checked against vendor advisories and vulnerability data.
VERSION DETECTION IS EVIDENCE, NOT FINAL PROOFBanners can be hidden, customized, proxied, or misleading. Vendors can also backport security fixes without changing version strings in the way a scanner expects. Do not treat a version match alone as proof that a CVE is exploitable.
Step 6: Run a Vulnerability Scanner Against the IP
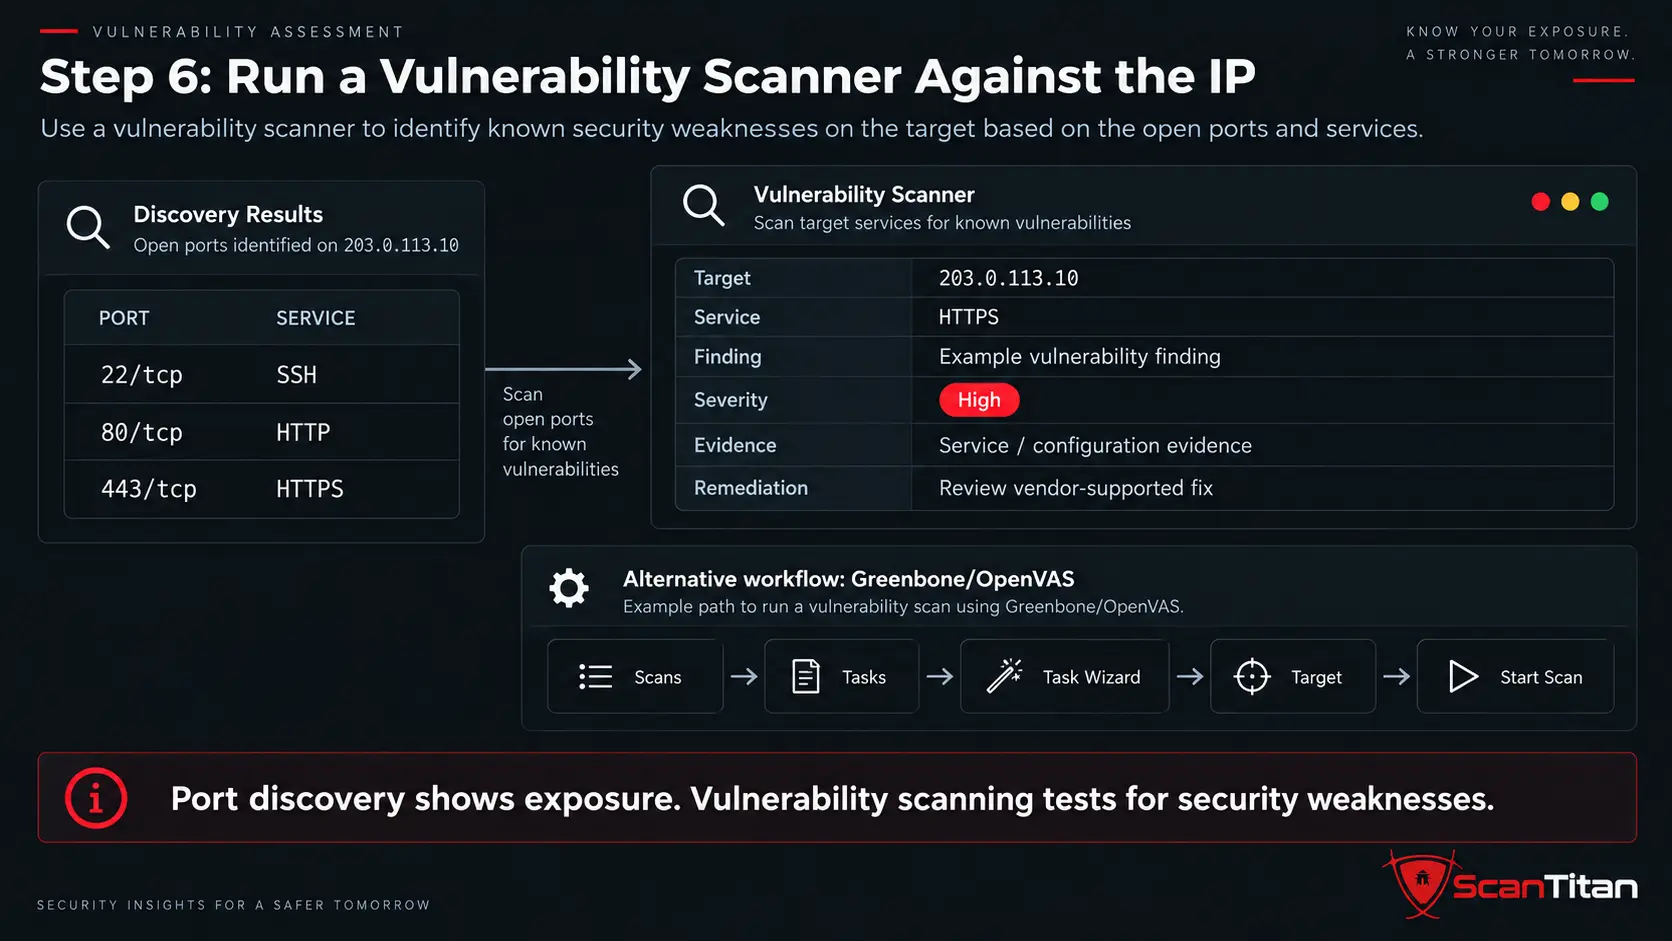
Port discovery and version detection tell you what appears to be exposed. The next stage runs actual vulnerability checks against those services and configurations.
A vulnerability scanner can combine service fingerprints, protocol-specific checks, vulnerability feeds, configuration tests, and product-specific detection logic to determine whether known weaknesses are likely to affect the target.Pick a scanner that matches the target, and use our comparison of free and paid vulnerability scanners if you need help choosing.
Option A: Scan the Public IP With ScanTitan
For an authorized public IPv4 or IPv6 target, you can enter the address into the ScanTitan IP Vulnerability Scanner.
The scanner can combine signals such as:
- reachable ports
- network services
- software and version evidence
- known vulnerability matches
- configuration findings
- severity data
- exploitation context where available
- remediation information
A finding could conceptually contain:
Target: 203.0.113.10
Port: 22/tcp
Service: SSH
Product/version: Detected
Finding: CVE-XXXX-XXXX
Severity: High
Evidence: Scanner-specific result
Do not move straight from that output to patching. The next step is to verify that the finding actually applies.
Option B: Scan the IP With Greenbone/OpenVAS
If you want an independent scanner workflow, Greenbone provides a straightforward way to create an IP target and run a vulnerability task.
Using the Task Wizard:
- Open Scans → Tasks.
- Select Task Wizard.
- Enter the authorized IP address or hostname.
- Select Start Scan.
- Wait for the task to complete.
- Open the generated report and review the findings.
For more control, you can create the target and task separately:
Configuration
→ Targets
→ Create Target
→ Enter IP address
→ Save

Scans
→ Tasks
→ New Task
→ Select Target
→ Save
→ Start
Greenbone supports individual IP addresses as well as broader ranges and CIDR targets. Its current documentation also distinguishes between checks that directly test a target and vulnerability prediction based mainly on product or version information.
This is why a useful workflow treats Nmap discovery and a vulnerability-scanning platform as complementary rather than assuming one command replaces an entire vulnerability assessment.
Step 7: Validate the Vulnerability Findings
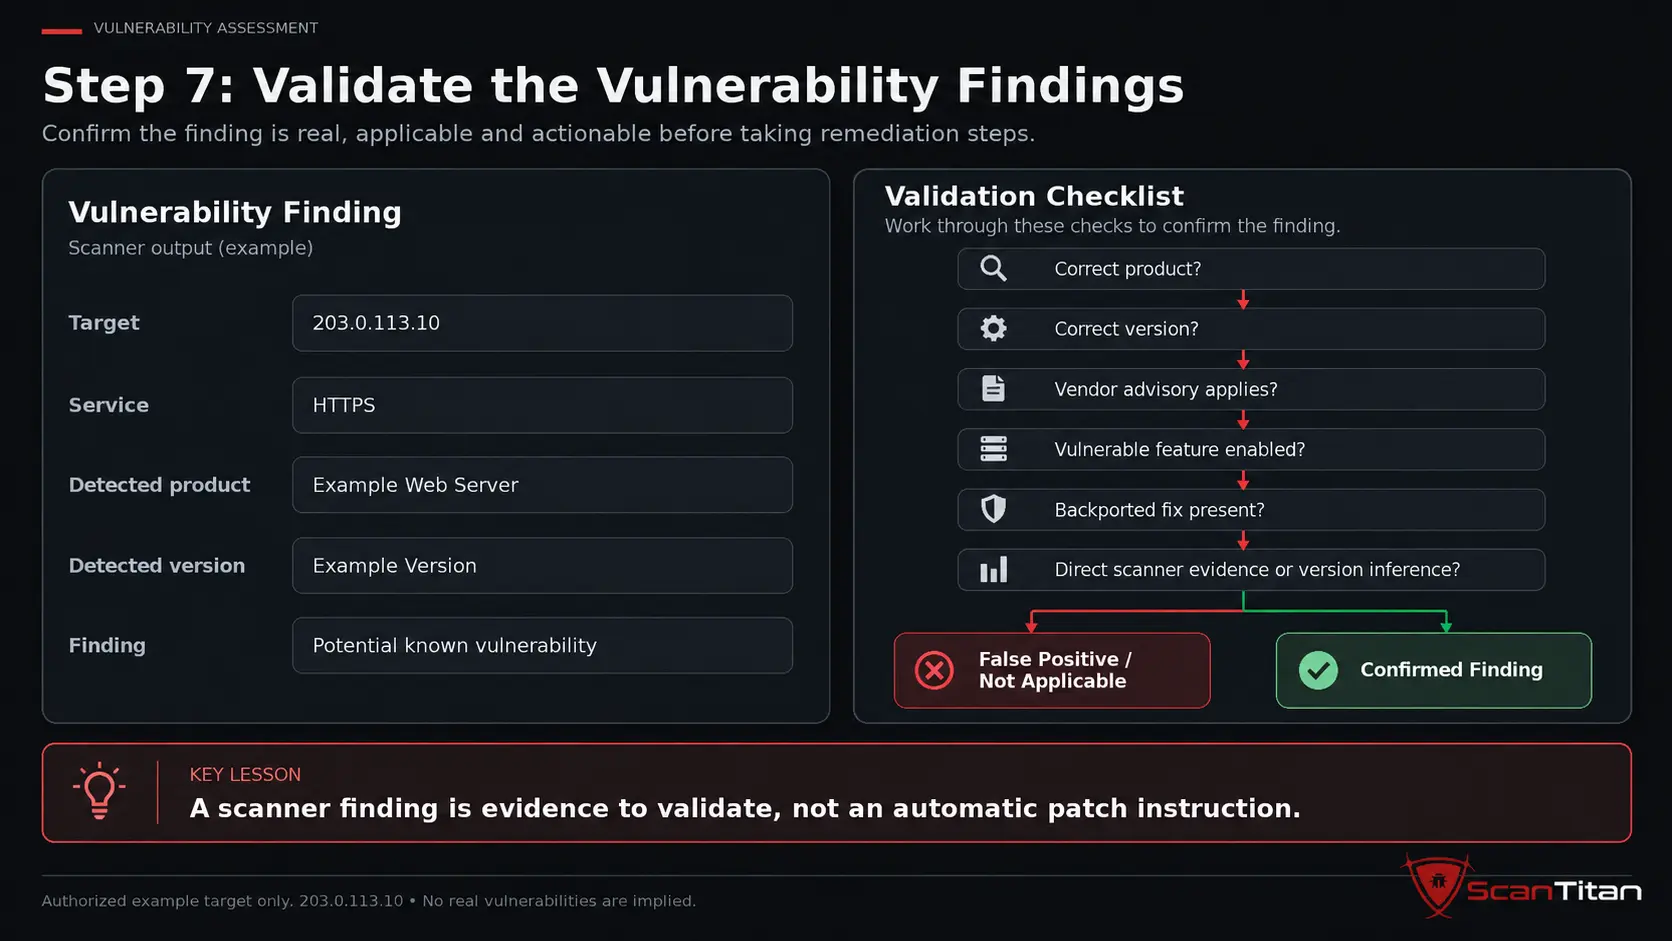
A scanner finding should trigger investigation, not automatic remediation. High-priority findings should be checked against the actual software, configuration, vendor information, and evidence returned by the scanner.
| Scanner reports | What you should verify |
|---|---|
| Software product | Did the scanner identify the correct product? |
| Software version | Is that version actually installed or exposed? |
| CVE | Does the CVE affect this edition, version, feature, and configuration? |
| Scanner evidence | What response, banner, protocol behavior, or check produced the result? |
| Vendor status | Does the vendor advisory confirm that this release is affected? |
| Fix status | Was the issue corrected through a normal update, configuration change, or backported patch? |
| Exposure | Can the vulnerable service actually be reached from the relevant network location? |
A version-based vulnerability match can follow a pattern like:
Detected software version
↓
Version falls inside known affected range
↓
Scanner reports CVE
But you should still ask:
- Was the product identified correctly?
- Was the security fix backported?
- Is the vulnerable feature enabled?
- Does the current configuration expose the vulnerable behavior?
- Did the scanner directly test the weakness or infer it from version information?
This is one reason scanner evidence matters as much as the vulnerability identifier itself.
Step 8: Prioritize the Confirmed Findings
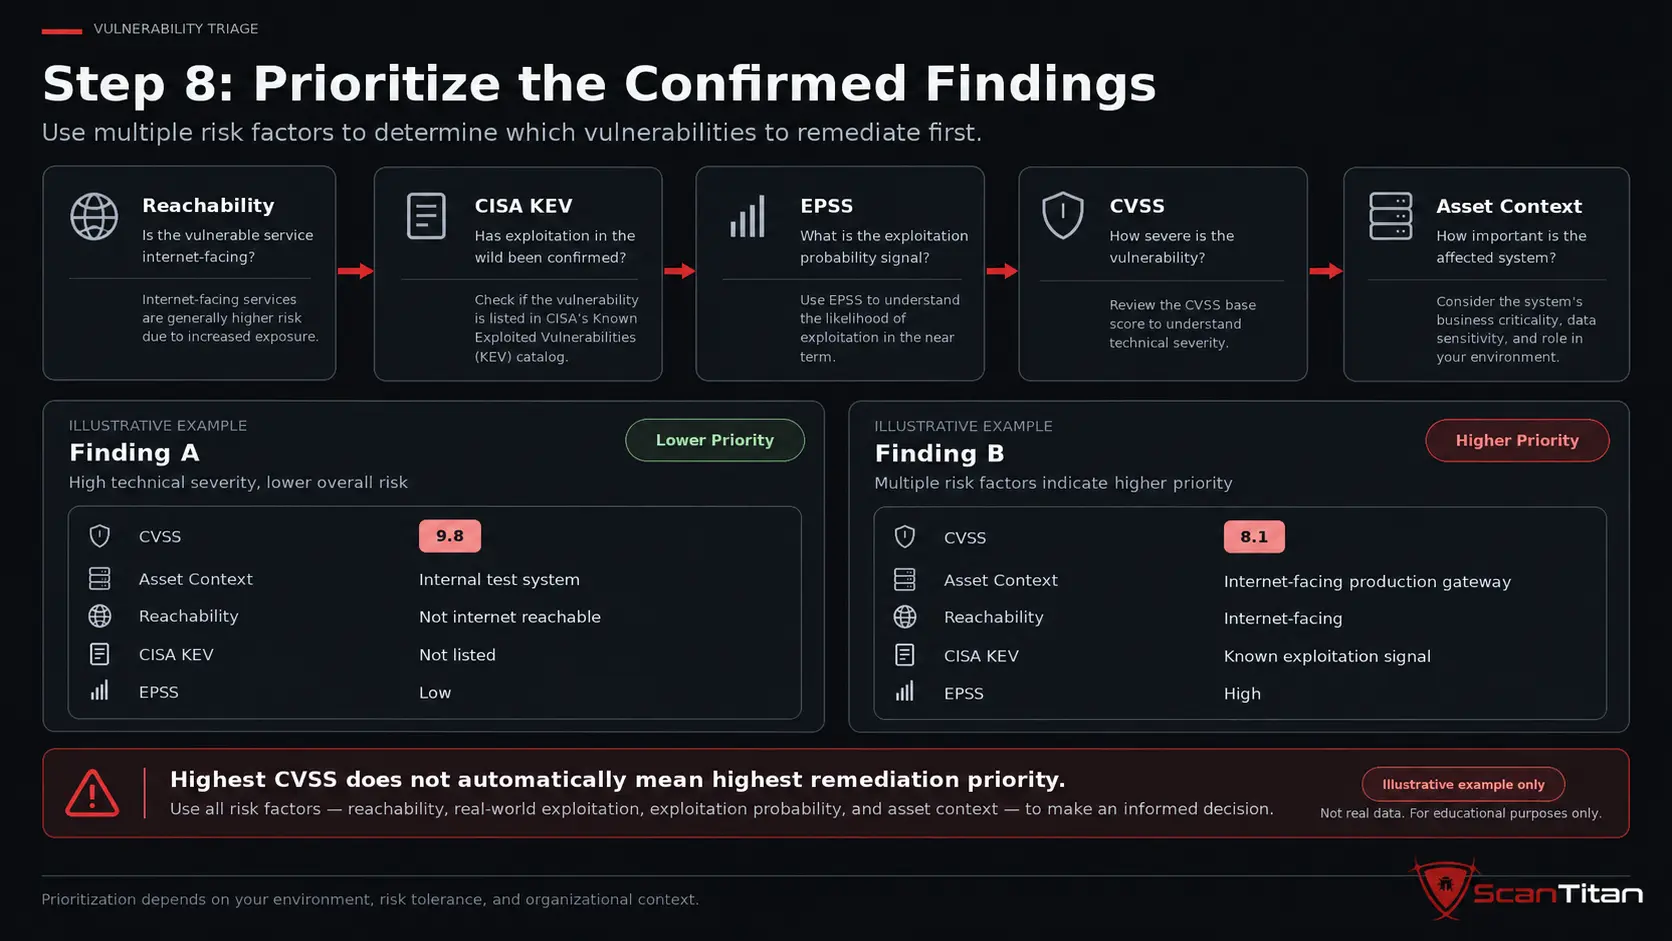
Do not automatically sort the report by CVSS and fix vulnerabilities from the highest score downward. Severity is useful, but it is only one input to remediation priority.
A better sequence is:
Is the finding confirmed?
↓
Is the affected service reachable?
↓
Is exploitation in the wild known?
↓
How likely is exploitation?
↓
How severe is the weakness?
↓
How important is the asset?
↓
What controls already reduce the exposure?
CVSS communicates vulnerability severity. FIRST explicitly distinguishes CVSS Base severity from a complete assessment of organizational risk.
CISA KEV indicates that CISA has evidence that a vulnerability has been exploited in the wild. KEV membership is useful prioritization evidence, but it does not mean that your particular host is being attacked at that moment.
EPSS estimates the probability that exploitation activity for a published CVE will be observed in the wild during the next 30 days.
The final decision still needs local context such as internet exposure, asset importance, reachability, compensating controls, and the function of the affected service.
Consider this deliberately simplified example:
| Signal | Finding A | Finding B |
|---|---|---|
| CVSS | 9.8 | 8.1 |
| Internet reachable | No | Yes |
| Known exploitation | No confirmed signal | Listed in KEV |
| Asset | Low-value test system | Production gateway |
The higher CVSS score does not automatically prove that Finding A deserves remediation before Finding B. Prioritization should combine the vulnerability with real exposure and asset context.
Step 9: Remediate the Confirmed Vulnerabilities
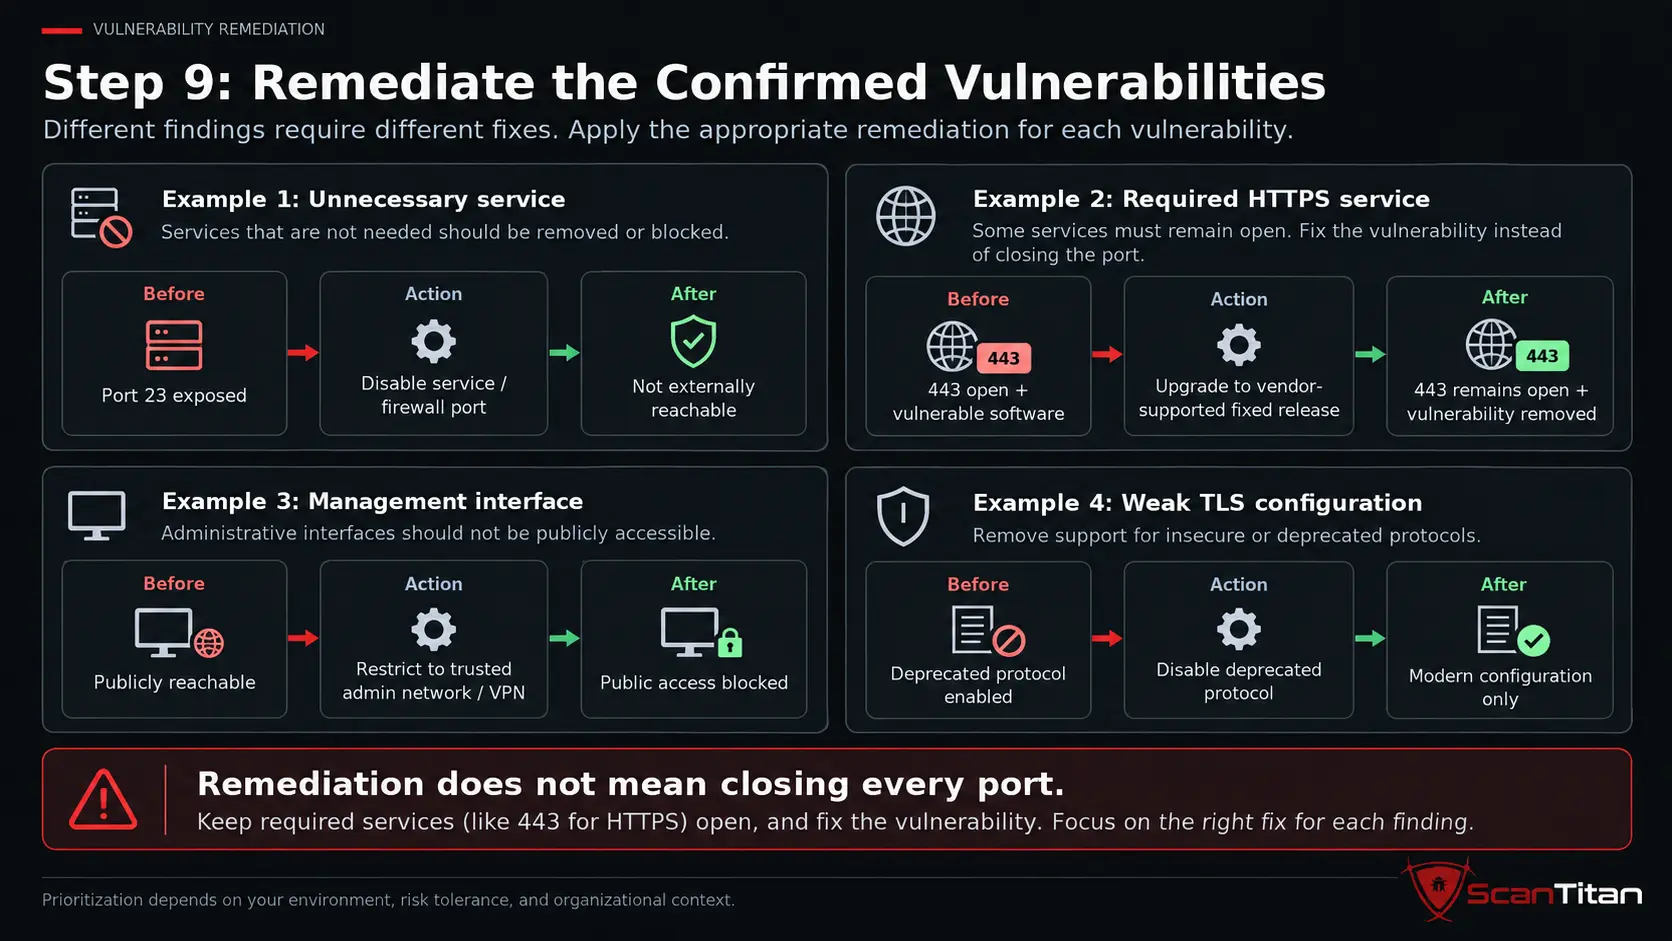
The appropriate fix depends on the type of issue the scan uncovered.
| Finding | Typical remediation |
|---|---|
| Unnecessary exposed service | Disable the service or block access to the port. |
| Required service exposed globally | Restrict source networks, apply firewall rules, or require VPN access where appropriate. |
| Vulnerable software | Upgrade to the vendor-supported fixed release. |
| Unsupported or end-of-life software | Upgrade or replace the product. |
| Deprecated protocol | Disable the obsolete protocol and reconfigure the service. |
| Weak TLS configuration | Remove deprecated protocol versions or weak cipher suites. |
| Exposed management interface | Restrict access to trusted networks or administrative paths. |
| False-positive version match | Document the evidence and resolve or tune the finding instead of changing a correctly secured system unnecessarily. |
THE GOAL IS NOT TO CLOSE EVERY PORTA required HTTPS service can remain available on port 443 after remediation. Success means removing the vulnerable condition while preserving legitimate functionality, not making every port disappear.
Step 10: Rescan the Same IP and Confirm the Fix
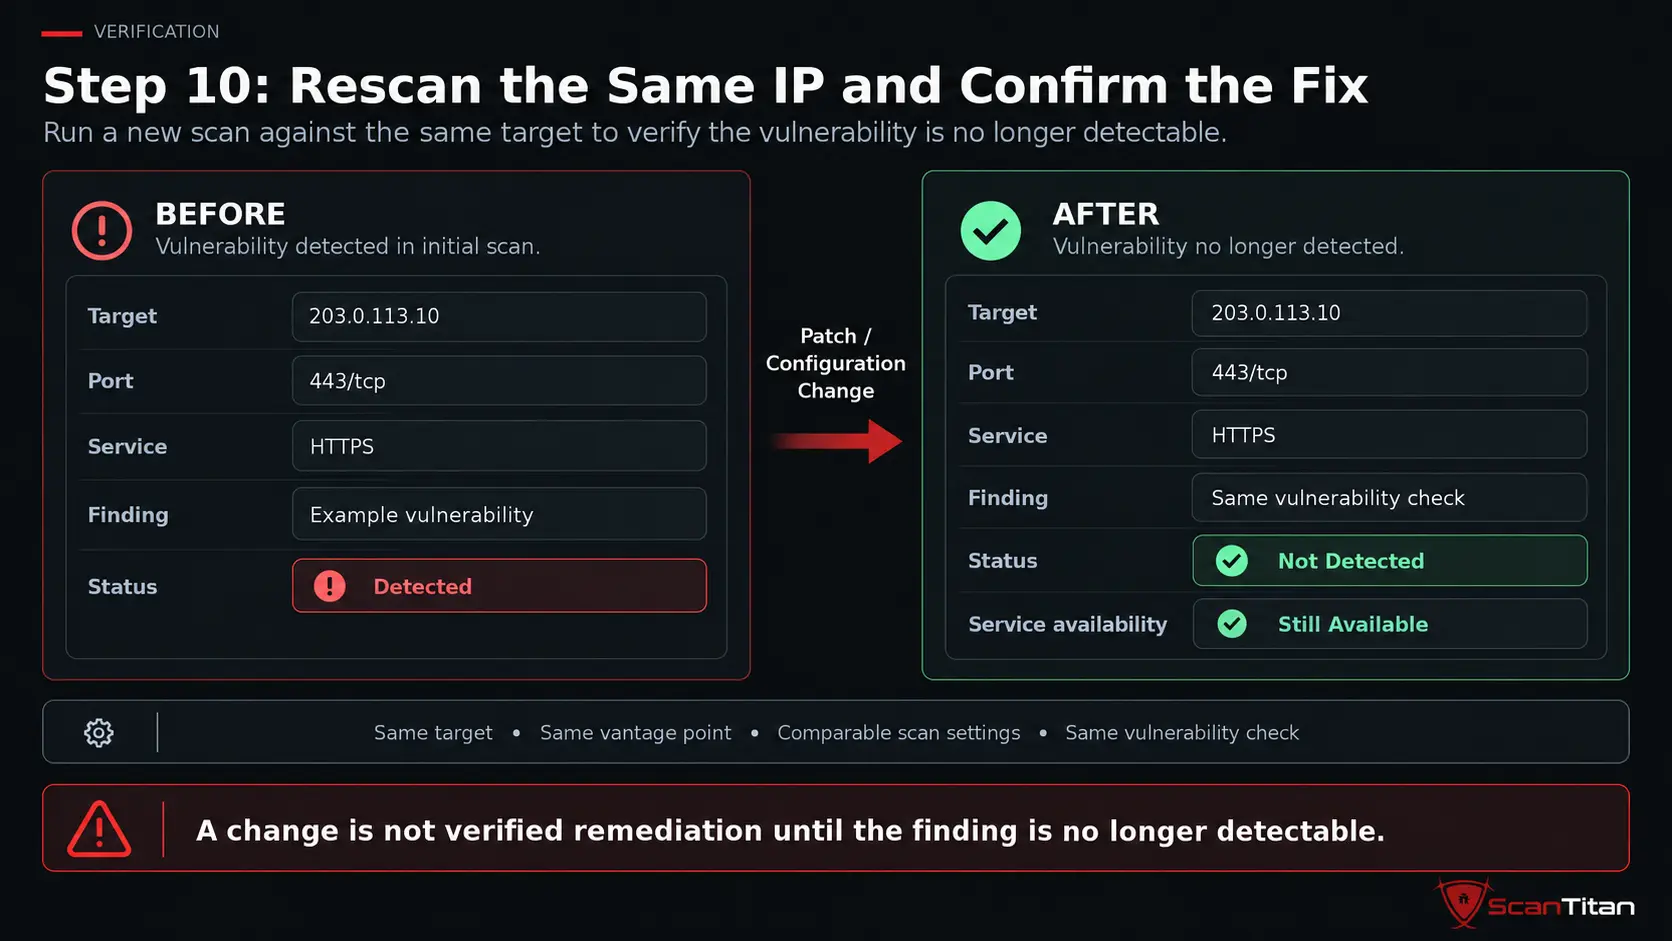
A remediation is not complete simply because somebody installed a patch or changed a configuration. Run the vulnerability scan again and verify that the original issue is no longer detectable.
For a meaningful comparison, keep the important conditions consistent:
- same IP address
- same relevant scan vantage point
- comparable scan configuration
- same affected service
- same vulnerability check
For example:
BEFORE

Target: 203.0.113.10
Port: 443/tcp
Service: HTTPS
Finding: CVE-XXXX-XXXX
Status: Detected
After remediation:
AFTER

Target: 203.0.113.10
Port: 443/tcp
Service: HTTPS
Finding: CVE-XXXX-XXXX
Status: Not detected
Service availability: Working
Notice that port 443 is still available. The acceptance criterion is that the vulnerable condition is no longer detected while the required service continues to work.
What If the IP Appears Down but You Know the Server Is Online?
A live host can ignore the discovery probes sent by a scanner. For example, a firewall might allow HTTPS on TCP 443 while silently dropping ICMP or other discovery traffic.
If you own the system and already know it is online, use:
nmap -Pn 203.0.113.10Or limit the next check to known relevant ports:
nmap -Pn -p 22,80,443 203.0.113.10This tells Nmap not to rely on its normal discovery stage before scanning. It does not make filtered services visible and it does not bypass access controls.
If the required service still appears filtered, investigate the firewall, routing path, cloud security group, host firewall, or other network controls between the scanner and the target.
Can Nmap Scan an IP Address for Vulnerabilities?
Nmap can contribute substantially to vulnerability assessment, but its role should be described accurately.
It is especially useful for:
- host discovery
- TCP and UDP port scanning
- service identification
- software and version fingerprinting
- targeted Nmap Scripting Engine security checks
The Nmap Scripting Engine includes vulnerability-oriented scripts, but a command such as:
nmap --script vuln 203.0.113.10should not be treated as a universal vulnerability-assessment recipe. The vuln category contains different scripts with different behaviors, and some NSE checks can be intrusive.
DO NOT RUN VULNERABILITY SCRIPTS BLINDLYReview the individual NSE script, understand what traffic or behavior it generates, and confirm that it is allowed by the assessment scope before running it against production systems.
For a structured vulnerability-management process, Nmap is best treated as strong discovery and service-enrichment evidence alongside a vulnerability scanner that provides broader detection logic, reporting, evidence, prioritization, and rescan history.
External vs Internal IP Scanning: Which One Should You Use?
The right scan location depends on the security question you want to answer.
| External scan | Internal scan |
|---|---|
| Runs from outside the network perimeter. | Runs from an internal or connected network location. |
| Usually targets public exposure. | Can assess private/internal IP addresses. |
| Shows services reachable from the internet. | Shows services reachable after internal access. |
| Useful for internet-facing attack-surface assessment. | Useful for internal patch, configuration, and lateral-exposure visibility. |
| Cannot see services blocked from outside. | Does not reproduce the external attacker view. |
If your question is “What can somebody on the internet reach at this public IP?”, use an external scan.
If your question is “What vulnerabilities exist on this private server inside my network?”, use an internal scanner that has network access to the address.
Many environments benefit from both because the two scan locations reveal different portions of the attack surface. For a deeper comparison, see internal vs external vulnerability scanning.
Common Mistakes When Scanning an IP Address
A technically successful scan can still produce a misleading assessment if the scope or results are interpreted incorrectly.
| Mistake | Why it matters |
|---|---|
| Scanning the wrong IP | Public, private, NAT, load-balanced, cloud, and IPv6 addresses can represent different exposure. |
| Assuming failed discovery means offline | Firewalls can suppress discovery probes while allowing actual services. |
| Checking only default TCP ports | A standard Nmap scan checks common ports rather than the entire TCP range. |
| Ignoring UDP | Relevant services can exist outside TCP. |
| Treating every open port as a vulnerability | A necessary and securely configured service can legitimately remain exposed. |
| Trusting a banner-based CVE match blindly | Versions can be misidentified or contain backported security fixes. |
| Running intrusive NSE scripts indiscriminately | Some checks may fall outside the authorized assessment scope. |
| Prioritizing only by CVSS | Severity does not include the complete exposure, threat, and asset context. |
| Assuming an external scan covers internal systems | External and internal vantage points have different visibility. |
| Failing to rescan | A configuration change is not the same as verified remediation. |
The Complete IP Vulnerability Scanning Workflow
The full process can be summarized as:
Confirm the correct IP and authorization
↓
Choose the external or internal vantage point
↓
Check target reachability
↓
Enumerate relevant TCP ports
↓
Check relevant UDP exposure
↓
Identify services and software versions
↓
Run vulnerability-specific scanning
↓
Validate important findings
↓
Add exploitation and asset context
↓
Remediate confirmed weaknesses
↓
Rescan the same target
↓
Verify that the finding is closed
The step most workflows skip: once you know which IPs serve web content, run a website scanner against the hostnames, not the raw IP addresses.
A useful IP vulnerability assessment is not the one that generates the longest report. It is the one that identifies applicable weaknesses, provides enough evidence to validate them, leads to a specific remediation, and confirms afterward that the weakness is no longer detectable.
Frequently Asked Questions
How can I scan my public IP address for vulnerabilities?
First verify that the public IP belongs to you or that you have authorization to test it. Scan the address from an external vantage point, identify its exposed TCP and relevant UDP services, run vulnerability checks, validate important findings, remediate confirmed weaknesses, and rescan from the same external location.
Can I scan a private IP address for vulnerabilities?
Yes. The scanner must have a network path to the private address. This normally means running it inside the network, through an approved VPN or connector, or from another authorized internal location.
Does an IP vulnerability scan check every port?
Not necessarily. Scan coverage depends on the scanner and its configuration. A normal Nmap scan checks 1,000 commonly used TCP ports, while -p- selects the complete TCP port range. UDP scanning is a separate process and may need its own scope.
Can Nmap find vulnerabilities?
Nmap can discover hosts, ports, services, and software versions and can run vulnerability-oriented NSE scripts. It is useful during vulnerability assessment, but a small set of Nmap scripts should not automatically be treated as equivalent to a full vulnerability-scanning platform.
Is an open port a vulnerability?
No. An open port means a service is reachable through that port. Risk depends on which service is running, whether the exposure is necessary, how the service is configured, whether applicable vulnerabilities exist, and what controls protect it.
Is it legal to scan an IP address?
Scanning systems you own or have explicit permission to assess is normal security work. Scanning third-party infrastructure without authorization can create legal, contractual, provider-policy, and operational risks. Define authorization and scope before starting an assessment.
Should I scan the same IP again after patching?
Yes. Rescanning from the same relevant vantage point verifies whether the original finding is still detectable and helps distinguish between making a change and actually remediating the vulnerability.